Sometimes, while making one thing, other beautiful disasters happen. This is how the Gif Box was born.

What I used
- Raspberry Pi 2 Model B
- Samsung EVO 32GB micro SD
- Official Raspberry Pi wifi dongle
- Cheap EBay Screen (see note)
3D Printed Case- UPDATED: I remixed a case custom fit to this screen here
Note: I highly recommend not using the same screen I did. It is not worth the headaches, especially if you are not comfortable working with linux. Instead, I highly recommend going with a well supported and documented screen like this one sold by Adafruit.
Get your pi working
Install and flash the the latest Raspbian Wheezy image to your SD card and get your Pi fired up. If you have never done that before, Here is where you can find some help. Also, if you have never done this before, this may not be the best first project. (As these instructions are not necessarily thorough.) (Or necessarily right)
The reason for Wheezy over Jessie, is that I tried multiple times to get my particular screen working with Jessie, and the support is just not there. From everything else I have read, this is true for most of the LCD screen shields. If you are skipping the shield, and going straight to HDMI -- this may be a non issue for you, and feel free to go with Jessie.
Get your screen working
Depending on which screen you have chosen, installation steps will vary. In my case I followed this guide for the Waveshare 3.2" even though my screen seems to be a cheap knock-off. Seriously, I highly recommend going with a nicer screen with proper support.
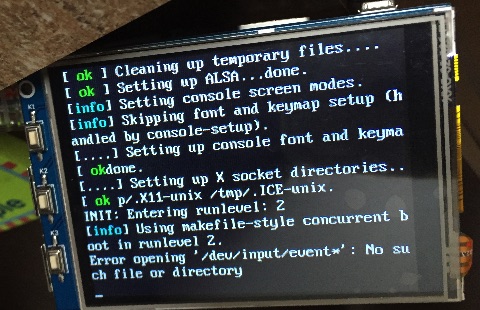
Ultimately, you will know you are ready for the next step when you end up with something looking like this:
Note: It seems most 'bargain' screens are shipped with a CD/DVD with an image on it that can be flashed to an SD card and be used immediately. But, I dunno. This is a tad shady. The one I was sent, the pi user's certs were already generated, and had a weird custom kernel. I'm sure the image is fine for a goofy lil gif box, but I would highly recommend using a fresh hand built image for anything serious.
Awesome, Time to turn this box into Gif box.
So here is the secret -- All this is is a kiosk. But with one little twist. It's a web kiosk that will open up any page you tell it to. That is how this whole thing was born. I was testing how hard it was to build a web kiosk with a Raspberry Pi, and needed a URL to test with. The rest is Giftory.
So, here are the steps to get the Raspberry Pi to auto boot into a nice clean borderless browser. These were stolen from here, and if you are using HDMI and not a screen shield, follow these instead of what I have below.
$ sudo apt-get update
$ sudo apt-get install x11-xserver-utils ttf-mscorefonts-installer xwit sqlite3 libnss3 matchbox chromium
Then add to your /etc/rc.local file
if [ -f /boot/xinitrc ]; then
    ln -fs /boot/xinitrc /home/pi/.xinitrc;
    su - pi -c 'startx' &
fi
Then in your /home/pi/.xinitrc file put the following:
#!/bin/sh
while true; do

    # Clean up previously running apps, gracefully at first then harshly
    killall -TERM chromium 2>/dev/null;
    killall -TERM matchbox-window-manager 2>/dev/null;
    sleep 2;
    killall -9 chromium 2>/dev/null;
    killall -9 matchbox-window-manager 2>/dev/null;

    # Clean out existing profile information
    rm -rf /home/pi/.cache;
    rm -rf /home/pi/.config;
    rm -rf /home/pi/.pki;

    # Generate the bare minimum to keep Chromium happy!
    mkdir -p /home/pi/.config/chromium/Default
    sqlite3 /home/pi/.config/chromium/Default/Web\ Data "CREATE TABLE meta(key LONGVARCHAR NOT NULL UNIQUE PRIMARY KEY, value LONGVARCHAR); INSERT INTO meta VALUES('version','46'); CREATE TABLE keywords (foo INTEGER);";

    # Disable DPMS / Screen blanking
    xset -dpms
    xset s off

    # Reset the framebuffer's colour-depth
    fbset -depth $( cat /sys/module/*fb*/parameters/fbdepth );

    # Hide the cursor (move it to the bottom-right, comment out if you want mouse interaction)
    xwit -root -warp $( cat /sys/module/*fb*/parameters/fbwidth ) $( cat /sys/module/*fb*/parameters/fbheight )

    # Start the window manager (remove "-use_cursor no" if you actually want mouse interaction)
    matchbox-window-manager -use_titlebar no -use_cursor no &

    # Start the browser (See http://peter.sh/experiments/chromium-command-line-switches/)
    chromium  --app=http://tv.giphy.com/

done;
Then, enjoy the fruits of your labor:
$ sudo reboot
So, can this do cat gifs?
Uh, Yeah. It can do hella cat gifs. So, if you look at the script above, the following line controls what site the Gif box boots into.
chromium --app=http://tv.giphy.com/
Just so happens, Giphy has their general full screen TV mode https://tv.giphy.com ... But their channels are based off of tags, so, to change the channel, just add the tag to the end of the url.
So, for example you can do like cat gifs, dog gifs, or even Justin Beiber gifs (Who am I to judge...). And yes event the NSFW ones work as well you dirty dirty bird.
By updating the URL in that line, you control what URL the Gif Box will boot into. And now, the world is your oyster. Your wonderfully animated oyster.
3D Printing the case
If you don't have access to a 3D Printer, there are many, many, many cases on amazon to choose from.
The case design I used is meant for a 3.5" screen. The screen I used was 3.2" but it fit pretty well -- just a hair of overlap on the bottom of the screen, and underlap on the rest of the sides.
Update: I did a remix of a case I really liked custom fit to this screen. The new case is located here. Printing settings are pretty much the same, except this time I used Hatchbox Black PLA ...
The settings I used for this print were:
- Printer: Printrbot Simple Metal
- Filament: Foxsmart Crazy Redhead Translucent Red PLA
- Slicing: Cura
- Temp: 208C
- Infill: 10%
- Supports: None
- Speed: 60mm/sec
Really was a simple uneventful print. Feel free to crank the speed up on this one a bit if needs be.